Remote Development on MPCDF Clusters
Maintainer: Zekun Lou
Note
For useful suggestions and instructions, check out the MPCDF Technical Documentation.
MPCDF SSH Configurations
To connect to the MPCDF clusters, you’ll need to configure your SSH settings. Setting up a jump host can make your life a lot easier. You can find more about these tricks in the MPCDF documentation: About gateway machine and tunneling.
Here’s an example SSH configuration for ADA with mpcdf_gate2 as a jump host, without canonical matching:
Host mpcdf_gate2
    HostName gate2.mpcdf.mpg.de
    User <your_username>
    ServerAliveInterval 30
    GSSAPIAuthentication yes
    GSSAPIDelegateCredentials yes
    ControlMaster auto
    ControlPersist 12h
    ControlPath ~/.ssh/master-%C

Host a02
    HostName ada02.bc.rzg.mpg.de
    User <your_username>
    ProxyJump mpcdf_gate2
    ServerAliveInterval 30
    GSSAPIAuthentication yes
    GSSAPIDelegateCredentials yes
    ControlMaster auto
    ControlPersist 12h
    ControlPath ~/.ssh/master-%C
Note
Replace <your_username> with your actual MPCDF username.
VS Code + Remote Development Extension
VS Code is one of the most popular code editors out there, with tons of extensions and plugins to make development better. It’s free and semi-open source, available for all major operating systems. You can install VS Code from the official website here.
One of the most useful extension packs for VS Code is the VS Code Remote Development extension suite. It lets you develop on a remote machine, container, or WSL, using the same set of tools and extensions as on your local machine.
VS Code Setup on Remote Machine
Once you’ve installed VS Code, you can install the Remote Development extension in the Extensions view by searching for Remote Development and install the packages by clicking on the clicking on the Install button at the bottom right corner of the panel.
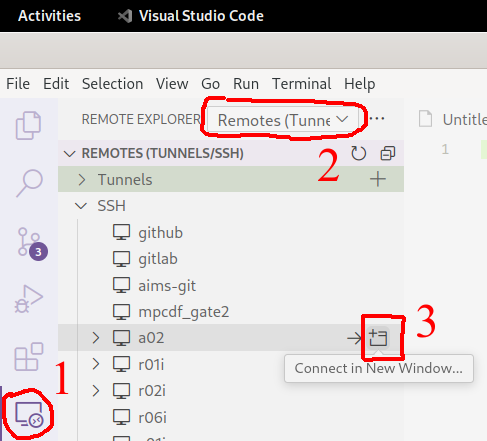
Now you’re ready for easy remote development: click on Remote Explorer view (the monitor icon on the side), switch to Remotes (Tunnle/SSH) in the top bar, and you should see all the SSH HostName entries you have in your SSH config file.
But before you click Connect in New Window, you probably don’t want to type your password and OTP every time, right?
I’d recommend logging in to the target remote machine through a local terminal first, and the ControlMaster settings will keep that connection alive.
Then click the connection button, and let’s move on.
Note
However, ControlMaster is only available on Linux, so Windows users, you’ll have to use some automation tools.
Suggested Extensions for Development
For Python development on MPCDF, we recommend the following VS Code extensions:
- Python Extension Package
The official Python extensions suite for VS Code. It provides rich support for Python, including linting, IntelliSense, formatting, refactoring, debugging, unit tests, and Jupyter.
The Python Environment Manager is included in this extension suite, so you can easily switch between different Python environments and manage your packages within the workspace.
- Jupyter
The Jupyter extensions suite for VS Code, which provides a rich interactive computing experience with Jupyter notebooks.
Personally I would perfer always using Jupyter notebooks in VS Code, because of more flexibility and more coding supports like the following extensions.
Optional extensions to consider:
- Pylance
Works alongside Python in VS Code to provide fast language support.
- Ruff
Better Python linting and code formatting, though not yet as popular.
- Rainbow CSV
Highlights CSV files in different colors to make them easier to read.
- Trailing Spaces
Highlights trailing spaces at the end of lines in red, useful for those who love tidy code and has obsessive-compulsive disorder.
- Resource Monitor
Monitor system resources directly in VS Code, so you can kill memory-hogging processes before the IT team comes knocking all the way from Garching.
- Error Lens
Shows error messages inline, exactly where they occur in your code, so you don’t have to scroll up and down to find them.
- Github Copilot and Github Copilot Chat
AI pair programming tool from GitHub to help you write code faster and more efficiently. Super useful for repetitive tasks and documentation writing. Students can get it for free by applying for GitHub Education as a student.
- Docs View
Displays hover documentation in the sidebar or panel.
Common Problems with MPCDF Clusters
First, it is good to know that VS Code has different setting levels: User, Remote Machine (e.g. Remote [SSH: <hostname>]), and Workspace (more and more specific).
You can find these subpage tags below the search bar in the settings page.
These settings have precedence in the order of User < Remote < Workspace (for more details, see here).
To ensure you don’t break your local settings, select the Remote [SSH: <hostname>] tag to configure shared settings for the <hostname> remote machine, and select the Workspace tag for workspace-specific settings.
The VS Code cannot automatically locate your conda environments because it cannot module load the conda command.
You have to manually set the python.condaPath in the settings to the path of the conda module, e.g. for anaconda/3/2023.03 on ADA it is /mpcdf/soft/SLE_15/packages/x86_64/anaconda/3/2023.03/bin/conda.
Generally it is ${ANACONDA_HOME}/bin/conda.
Also you may need to set python.analysis.extraPaths in settings to enable Python code analysis for the packages you load with module load, e.g. h5py-mpi or mpi4py.
For example, on ADA you add /ada/u/system/soft/SLE_15/packages/skylake/mpi4py/intel_21.6.0-2021.6.0-anaconda_3_2023.03-2023.03-impi_2021.6-2021.6.0/3.1.4/lib/python3.10/site-packages for mpi4py/3.1.4, and /ada/u/system/soft/SLE_15/packages/skylake/h5py-mpi/intel_21.6.0-2021.6.0-anaconda_3_2023.03-2023.03-impi_2021.6-2021.6.0/3.8.0/lib/python3.10/site-packages for h5py-mpi/3.8.
Still you can find these paths by module show <package>.
Best Practices
Rapid Development with Jupyter Notebooks
You can run Jupyter notebooks directly on the remote machine. Just create an xxx.ipynb file, open it, and work as usual, but with more programming support from the VS Code extensions.
Debugging
First, switch to a dark theme in VS Code to avoid attracting more bugs. Then use the built-in debugger to set breakpoints, step through your code, and inspect variables as you debug Python scripts. You can find the shortcut keybindings by searching for “jupyter debug” in Keyboard Shortcuts settings.
Autoreload
You’ve probably seen the autoreload magic command in Jupyter notebooks.
It automatically reloads the modules before executing the code, so it is useful when you are developing a module and want to see the changes immediately.
You can find more information here.
For example, if you have your own Python package mypytools and are working on the file mypytools/utils.py, you can use the following commands in a Jupyter notebooks to reload this Python file automatically:
%load_ext autoreload
%autoreload 1
%aimport mypytools.utils
from mypytools.utils import my_tool_func, MyToolClass
%autoreload 1 means “Reload all modules imported with %aimport every time before executing the Python code typed”.
Other Tricks
You can toggle the line numbering by clicking on the blank area (switch to non-inputFocus status) and then do keyboard shortcut Shift+L.
You can avoid super-long cell output by enabling notebook.output.textLineLimit in the settings, then you can have the outputs in boxes with scrollbars.
Use GPU CUDA in Jupyter Notebooks
Sometimes you want to develop Python + GPU code interactively in Jupyter notebooks, but there aren’t any GPUs on the MPCDF login nodes.
Here’s a solution to use GPU nodes on MPCDF clusters for Jupyter notebooks, using the ADA cluster as an example. We’ll use the salloc command to allocate resources and then run the Jupyter server on the allocated node.
You can find more information about salloc here.
First, allocate a GPU node on the ADA cluster via the salloc command:
zklou@ada02:~> salloc --job-name=alloc1node --partition=p.ada --time=0-04:00:00 --nodes=1 --ntasks=4 --cpus-per-task=18 --gres=gpu:a100:4
salloc: Granted job allocation 254308
salloc: Waiting for resource configuration
salloc: Nodes adag041 are ready for job
This means you are requesting 4 MPI tasks, each with 1 GPU and 18 CPUs, for 4 hours.
The job ID is 254308 and it is running on node adag041.
Everything you run (prefixed by srun) in the current shell will be executed on the allocated node.
So don’t close this shell, or you’ll lose the allocated resources
Use the following bash script to start a Jupyter server on the allocated node:
# switch to conda env and activate modules, I like to put them in a shell script
source ~/.env.ipi_mace.sh  # NOTE: replace with your own script!!!

# setup paths
SCRIPT_DIR=$( cd -- "$( dirname -- "${BASH_SOURCE[0]}" )" &> /dev/null && pwd )  # the bash script dir
WORK_DIR=${SCRIPT_DIR}
LOG_DIR=${SCRIPT_DIR}/logs
echo "SCRIPT_DIR=${SCRIPT_DIR}"
echo "WORK_DIR=${WORK_DIR}"
echo "LOG_DIR=${LOG_DIR}"
# if logdir does not exist, create it
if [ ! -d ${LOG_DIR} ]; then
    mkdir -p ${LOG_DIR}
fi

# setup log files
hpc_tag=${SLURM_JOB_ID}_$(date +%Y%m%d_%H%M%S_%3N)
file_out=${LOG_DIR}/jupyter.${hpc_tag}.out
file_err=${LOG_DIR}/jupyter.${hpc_tag}.err
echo "hpc_tag=${hpc_tag}"
echo "file_out=${file_out}"
echo "file_err=${file_err}"

# run a jupyter server with one gpu, redirect output and error to log files
cd ${WORK_DIR}
srun --job-name=jupyter --exclusive --partition=p.ada --chdir=${WORK_DIR} \
    --ntasks=1 --cpus-per-task=18 --mem=250000 --gres=gpu:a100:1 \
    jupyter server --port=11415 --ip=0.0.0.0 --no-browser \
    > ${file_out} 2> ${file_err} &

echo "job scheduling finishes at: $(date)"
You can find the Jupyter server URL in the log file (the one for errors). It will look like this:
[I 2024-10-17 14:28:16.186 ServerApp] Extension package jupyter_lsp took 0.3877s to import
...... (jupyter loads its packages)
[I 2024-10-17 14:28:23.782 ServerApp] Serving notebooks from local directory: /ada/u/zklou/projects/tbmd
[I 2024-10-17 14:28:23.782 ServerApp] Jupyter Server 2.14.0 is running at:
[I 2024-10-17 14:28:23.782 ServerApp] http://adag041:11415/?token=97538671c1cf52004420ecaa805d8a18ceb21dd416a6455b
[I 2024-10-17 14:28:23.782 ServerApp]     http://127.0.0.1:11415/?token=97538671c1cf52004420ecaa805d8a18ceb21dd416a6455b
[I 2024-10-17 14:28:23.782 ServerApp] Use Control-C to stop this server and shut down all kernels (twice to skip confirmation).
[C 2024-10-17 14:28:23.805 ServerApp]

    To access the server, open this file in a browser:
        file:///ada/u/zklou/.local/share/jupyter/runtime/jpserver-72185-open.html
    Or copy and paste one of these URLs:
        http://adag041:11415/?token=97538671c1cf52004420ecaa805d8a18ceb21dd416a6455b
        http://127.0.0.1:11415/?token=97538671c1cf52004420ecaa805d8a18ceb21dd416a6455b
Then, go back to a Jupyter notebook page in VS Code running on the remote machine.
Click the upper right kernel selection button, select “Select Another Kernel…”, then “Existing Jupyter Server…”, then “Enter the URL of the running Jupyter Server”, input the URL like http://adag041:11415/?token=xxx, press Enter, and select the proper Python kernel.
Now you can enjoy the GPU power.
Then you can test if GPU availability with !nvidia-smi or !echo $CUDA_VISIBLE_DEVICES in a Jupyter notebook cell.
Also you can check it by pytorch like
>>> import torch
>>> print(
>>>     torch.cuda.is_available(),
>>>     torch.cuda.current_device(),
>>>     torch.cuda.device_count(),
>>>     torch.cuda.get_device_name(0)
>>> )
True 0 1 NVIDIA A100-SXM4-80GB
You can check the task status by:
zklou@ada02:~> sacct -j 254308
JobID           JobName  Partition    Account  AllocCPUS      State ExitCode
------------ ---------- ---------- ---------- ---------- ---------- --------
254308       alloc1node      p.ada       mpsd        144    RUNNING      0:0
254308.exte+     extern                  mpsd        144    RUNNING      0:0
254308.0        jupyter                  mpsd         36    RUNNING      0:0
If you want to stop the Jupyter server, run scancel 254308.0 to cancel this step, but not the entire salloc job.